Automatic maintenance performs processes like disk defragmentation, scheduled scan, check for solutions, error reporting, software updates e.t.c. By default it runs automatically in the background when computer is idle or at regular bases everyday. The idle maintenance may stop when computer is in use but regular one doesn't stop unless it is finished. While it is running, a clock icon is displayed over the action center icon in taskbar.
It is trouble for some users because while running, it reduce battery timing and performance of computer by triggering heavy processes.
2. Now on left pane (drop down menu) navigate to Task Scheduler Library > Microsoft > Windows > Task Scheduler.
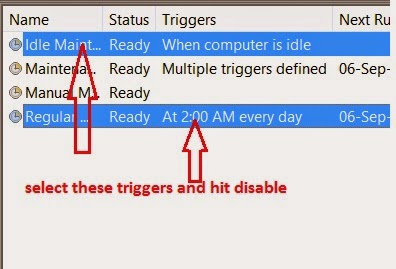
3. You'll see four options on middle pane. Select the top and bottom one which says "Idle Maintenance" and "Regular Maintenance". by holding Ctrl and Clicking on them once.
It is trouble for some users because while running, it reduce battery timing and performance of computer by triggering heavy processes.
How to Turn off Maintenance Service
1. Go to Control Panel > Administrative Tools > Task Scheduler.2. Now on left pane (drop down menu) navigate to Task Scheduler Library > Microsoft > Windows > Task Scheduler.
 |
| Task scheduler library |
3. You'll see four options on middle pane. Select the top and bottom one which says "Idle Maintenance" and "Regular Maintenance". by holding Ctrl and Clicking on them once.
 |
| Task Scheduler Processes |
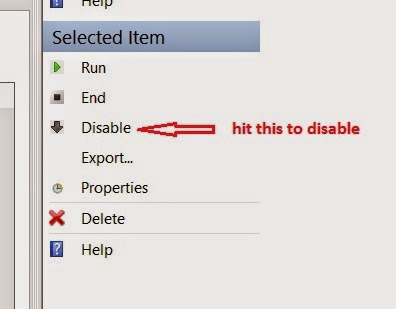
4. Now hit "Disable" at right bottom menu and these triggers will be disabled.
 |
| Disable Maintenance Triggers |
Now the idle and regular maintenance won't run. But you can manually perform it from the action center whenever you want.
No comments:
Post a Comment